Using Raspbian on 2GB Micro SD Card
Raspberry Pi 2 with Raspbian on a 2GB micro SD card? Feasible. If you need additional space for storing data, you can always attach thumb drives.
Motivation
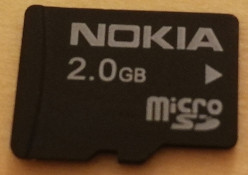
I have been using NOOBS with Raspbian Jessie installed onto an 8GB micro SD card. While cleaning up my store room, I found a 2GB micro SD card that was bundled with a phone I once used, Nokia N82 which by the way, still works other than the battery. It is a Nokia after all. I benchmarked the 2GB card and discovered that it could sustain writes of 4.4MB/s. Speed-wise, this is comparable to my existing 8GB card. I decided to give the 2GB a chance to fame.
By freeing the use of my 8GB card, I can repurpose it for other future needs. USB thumb drive can be attached to get additional space for storing data. Fine by me given that I have more spare thumb drives than micro SD cards.
Requirements
Let me spell out my definition of minimum viable product on my Pi 2:
- Must have Kodi.
- Must have Docker.
- Must have GitLab Runner.
- Must have pre-requisites for running .NET Core apps.
What I explicitly do not need:
- Desktop environment.
- Swap.
Download and write Raspbian image onto micro SD
Raspbian Stretch Lite is the image that I am using. The Lite variant does not come with Desktop. Whatever it does not have, if required, can be installed later.
Writing an image file to SD card using Ubuntu is convenient. Start the Disks Utility, select the SD card and restore the image onto it.
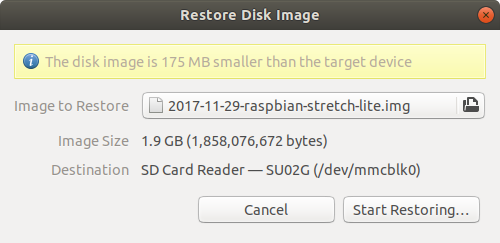
Then, boot up Pi with the micro SD attached. On first run, Raspbian will adjust the partition to fully utilise the available space.
If you do not know how to write this image to a SD card, please refer to installation guide.
Remove swap
This prolongs the life of the card and saves some space:
sudo chmod -x /etc/init.d/dphys-swapfile
sudo swapoff -a
sudo rm /var/swap
Installing packages
Before installing anything, update Raspbian:
sudo apt update
sudo apt upgrade -y
sudo apt autoremove
Then I installed and configured the following:
- Kodi:
sudo apt install kodi - Docker (refer to Debian armhf).
- GitLab Runner (refer to Debian).
- .NET Core (I blogged about this).
Finally, clean apt cache:
sudo apt clean
Free space left
With all the above, here is a snapshot of my df -h:
Filesystem      Size  Used Avail Use% Mounted on
/dev/root       1.8G  1.5G  282M  84% /
devtmpfs        418M     0  418M   0% /dev
tmpfs           423M     0  423M   0% /dev/shm
tmpfs           423M   11M  412M   3% /run
tmpfs           5.0M  4.0K  5.0M   1% /run/lock
tmpfs           423M     0  423M   0% /sys/fs/cgroup
/dev/mmcblk0p1   41M   21M   21M  51% /boot
tmpfs            85M     0   85M   0% /run/user/1000
Roughly 280MB of free space left. Not too bad.
Attaching a USB storage
Docker will require Gigabytes of free space to store images. For this, I attached an 8GB thumb drive.
Insert an Ext4-formatted USB thumb drive. Label it with a meaningful name. I labelled it DOCKER.
Then add a line into /etc/fstab:
LABEL=DOCKER /mnt/usb ext4 defaults,noatime 0 1
Referring to Docker documentation, to tell Docker to use a different root directory, create a file at /etc/docker/daemon.json with the following content:
{
  "data-root": "/mnt/usb/docker"
}
Restart Docker to take effect:
sudo service docker restart