How to disable TLS 1.0 on an Azure App Service
Yes it is possible to disable TLS 1.0 and even 1.1 without using App Service Environment (ASE). The solution is to use Azure Application Gateway and a custom hostname.
Update
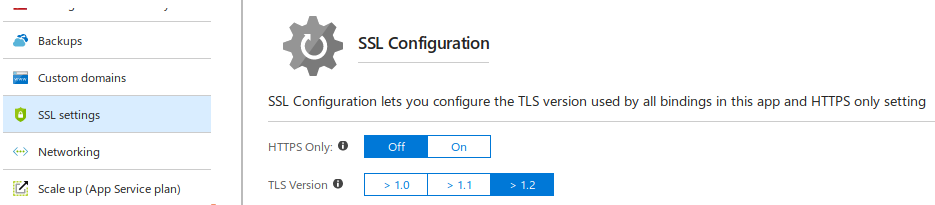
- 2018-04-20: I just realised a few days ago that the TLS version of an App Service can now be configured via the Portal. This means the workaround described in this post is no longer necessary.
Motivation
I like using Platform as a Service (PaaS) because it abstracts the complexities of managing the underlying layer. Of course it does incur additional cost but this is usually not a showstopper. An example of a showstopper is when there is a special need to bring forward disabling of less secure cryptography protocols. Failure which, switching to a different hosting option has to be considered!
Disclaimer
Before jumping to the solution, I need to state that the way I am proposing is considered not supported by Azure.
What I have gathered
I know I am not alone in facing this issue and I have been Googleing monthly in search for a viable solution. As at 4th July 2017, below are points that I have found to date:
- Application Gateway FAQ states that Support for Azure Web Apps is not available today.
- RC4 has been disabled but there are a few comments requesting for TLS 1.0 to be disabled along.
- There was a request on Azure Feedback forum to give users the means to disable TLS 1.0 but it was declined.
- Another request to disable TLS 1.0 as these users are failing Trustwave Vulnerability scan was marked completed when it has not.
- Yet another request to disable TLS 1.0 but was marked completed with reference pointing to ASE.
Known viable options
If you are fine with either of these:
- Switching to Web Role on Azure Cloud Service which then allows tweaking the underlying O/S layer to do whatever.
- Upscaling to ASE and pay a price premium.
Where and how the solution was derived
My solution involves use of Azure Application Gateway and a custom hostname over existing Web App.
The idea came after reading a comment by user Gwallace@MSFT (moderator) who stated the following comment on 18th May 2017:
Application Gateway forwards the request to the backend with the same host header it receives from the client, this is an issue with backends that are listening on a different hostname, which can be the case with WebApps.
The key bits are “same host header”.
In theory, it should work by doing the following:
- Custom hostname with CNAME to the gateway hostname.
- The gateway backend pointing to Web App,
<your website>.azurewebsites.net. - The Web App must serve content when HTTP Host header matches the custom hostname.
I had to do a few extras so I would suggest following the steps below.
Steps
Assumptions
You have the following:
- An existing Web App on App Service Plan. Free plan is a no-go as it does not allow setting custom domain.
- A domain name where you have control to create/update CNAME on a subdomain.
- To qualify for SLA, 2 or more instances of medium or larger App Gateway are required. You understand the cost additions of adding this.
Setup App Service custom domain
- Setup a subdomain with CNAME to
<your website>.azurewebsites.net. Note that DNS information may take up to 24 hours to propagate. - On Azure Portal, navigate to your
App Service. Then go toCustom domains. - Next click on
Add hostname. Enter the FQDN of your subdomain and click onValidate. Azure will perform an ownership check to ensure that you are the owner of the domain by checking your subdomain’s CNAME record. Ensure this passes before proceeding!
Setup Application Gateway
- Add
Application Gateway. - You are then informed the terms to qualify for SLA. Click on
Create. Standardtier is fine. ChooseWAFif you prefer.- The location should ideally be the same as per your App Service so that we can leverage on SSL termination.
- Click
OKto proceed. - Create a new
Virtual network(or existing if you know what you are doing). You need to give a name. Address space, subnet name, and subnet address range have been prepropulated. - Frontend IP address type is set to
Public. - Create a new
Public IP address. - Set protocol to
HTTPS. You will need to create another listener forHTTPlater (if you want this too) but I am not demonstrating that to focus on disabling specific TLS versions. Port number will automatically be set to443. For testing purposes, I created a self-signed PFX which I will not detail as you can find plenty of tutorials elsewhere. The PFX must be password protected. - Click
OKto proceed. Expect up to 20 minutes for gateway to be created. - Once the gateway has been created, navigate to
Overviewas further configuration is required. - Change the CNAME of your subdomain to point to your newly created frontend public IP address,
<guid>.cloudapp.net. - Go to
Backend pools. One has already been created namedappGatewayBackendPool. Click on it then add<your website>.azurewebsites.net. Remember to clickSave. - Go to
Health probes. Add a new one that points to<your website>.azurewebsites.net. Root (/) path is fine. ClickSave. - Go to
HTTP settings. CheckUse custom probeand point to the newly created probe. - Go to
Backend health. Ensure that the status isHealthyotherwise you missed a step.
Disabling TLS 1.0 and 1.1
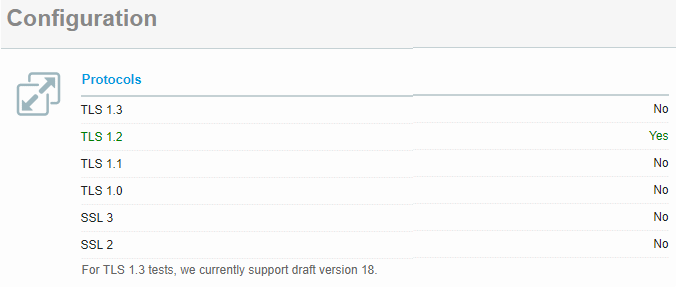
Firstly, verify the list of TLS protocol versions supported as-is. Go to Qualys SSL Labs SSL Server Test. A warning will appear if you used a self-signed certificate. Choose to proceed. You should now be seeing TLS 1.0, 1.1 and 1.2 marked Yes.
Start PowerShell and enter the following commands. Please note in the example below both TLS 1.0 and 1.1 are to be disabled. You can omit the latter if you prefer to keep it supported:
$gw = Get-AzureRmApplicationGateway -Name <your gateway name> -ResourceGroupName <your resource group>
Set-AzureRmApplicationGatewaySslPolicy -DisabledSslProtocols TLSv1_0, TLSv1_1 -ApplicationGateway $gw
$gw | Set-AzureRmApplicationGateway
Once the last command has completed, perform a new SSL test and you should now be seeing just TLS 1.2 marked Yes.